Today on SocialPositives.com, we are reviewing Joyoshare Video Cutter for Mac, a super video cutter for Mac users. If you are an avid reader of my blog, you must see our recent review of Joyoshare Screen Recorder.
If you are a Blogger or a YouTube Vlogger, you should need a good Screen Recorder to record screen to Blogging tutorials and to run tutorials on YouTube. Here I suggest you try Joyoshare Screen Recorder, I’m sure you will love that.
Why Joyoshare?
You can find a lot of similar software available on the web but I have some reasons to opt Joyoshare over others because it is almost perfect with performance and features. Yes, it runs smoothly on your Mac or Windows PC’s.
Joyoshare Screen Recorder, Video Cutter or Joyoshare’s any other tools, all flood up with great advanced features that make them best in the industry.
Here we go with some of the best features of Joyoshare Video Cutter for Mac.
-
- Comes with a free trial
- Compatible with Mac OSX 10.8/10.9/10.10/10.11/10.12/10.13
- Multifunctional video/audio cutter
- Work at 60x faster speed with 100% lossless quality
- Cutting and converting all popular video file including M4V, AVI, MP4, MPG, MPEG, 3GP, 3G2, WMV, ASF, RM, RMVB, DAT, MOV, FLV, and HD Video formats like HD AVI (VC-1, MPEG-4), MTS/M2TS/TS/TRP (AVHD H.264, VC-1, MPEG-2 HD), HD WMV (VC-1, WMV HD), HD MKV (H.264), etc.
- Cutting and converting all popular audio like M4A, M4B, M4P, M4R, MP3, M4A, MP2, MPA, WMA, AAC, AC3, MKA, OGG, AIFF, RA, RAM, WAV, APE, FLAC, AA, AAX, etc.
Get Started with Joyoshare Media Cutter
I’m sure you are now eagerly looking to learn to use Joyoshare Media Cutter. Are you ready?
1. Download the Joyoshare Media Cutter Software from the official site.
2. Accept the terms and conditions and Install.
3. Launch the software.
How to use Joyoshare Media Cutter?
Now it’s time to use the software to do editing works.
1. Add Video or Audio Files to Joyoshare
Now add Video or Audio files to Joyoshare. You have 2 options to do that. Click the “Open” button to add video/audio files or drag media files to Joyoshare.

2. Set the Cut Segment
Now set the cut segment. The best method is to clip the content by using the control key. Also, you can set the temporal interval. Click “Format” now.

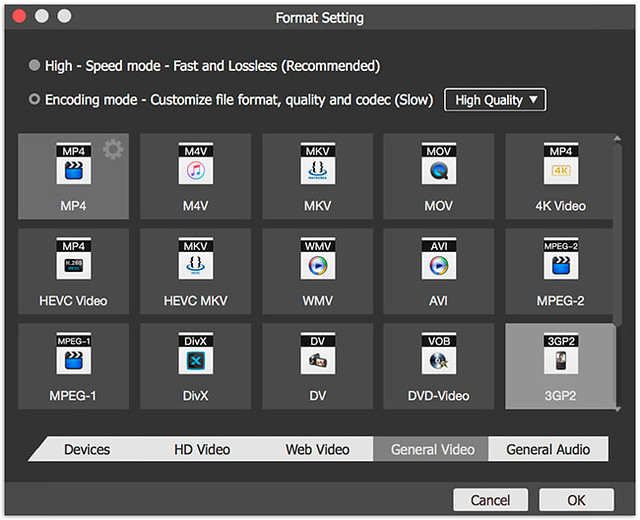
3. Select the output format and Destination Folder
Now select the output format and destination folder to save your file.

Here you have 2 options to set output format. The first one is the high-speed mode that works get the videos/audios quickly with 100% original quality.
The Encoding format lets you customize the video/audio files, such as file format, quality and codec.
4. Click “OK”
Click “OK” to start. Now a Pop-up Window will appear just click “Continue”.
Click the “Start” button after you have completed all settings.
Price and Availability
You can try Joyoshare Media Cutter for Mac on your device for free within the trial period. You can buy the Yearly license for $29.95, Family License for $49.95 that supports 2-5 PC/Lifetime and Unlimited license for just $69.95 for 5+ PC for the lifetime.
Final Verdict
Joyoshare Media Cutter for Mac comes with a clean interface and it can be used by everyone, you won’t need to be an expert. Joyoshare Media Cutter comes with 30 days money back guarantee so you won’t need to worry about the purchase.


